| |||
 |
 |  | |
 |
 | ||
 |
 | ||
 |  | ||
 |  | ||
| |||
|
|
| | |
|
| ||
|
|
| ||
| | ||
|
| | ||


 TM Buyer's Guide Pages"> TM Buyer's Guide Pages">

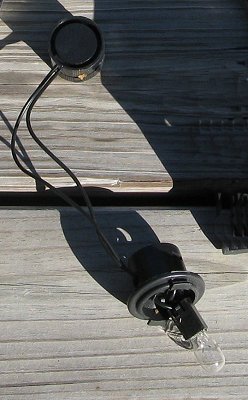
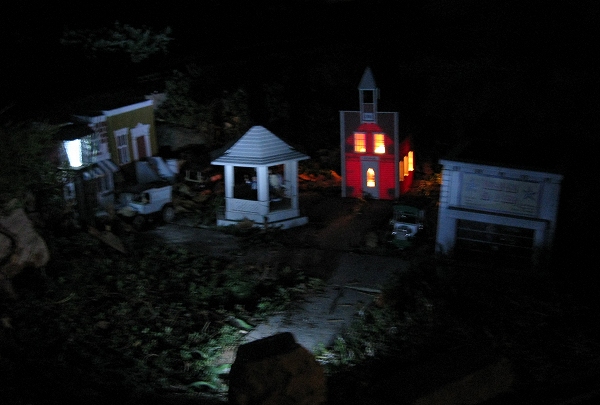
 | Lighting Buildings with Low Voltage Garden LightingLast year, after having an after-dark "open house" I realized how "dead" my garden railroad looked at night with just the trains running. So I experimented with solar lighting, since it seemed easy and relatively inexpensive. In fact there are still solar lamp posts on my railroad today, as you can see in manyphotographs for this article. Limitations of Solar - This fall, I have been planning for a November after-dark open house, and I realized that the solar lighting won't be enough. In the summer, the lamp posts go on late and have a full charge that takes them into the wee hours of the morning. By November, however, they'll be coming on about 6:00PM and only going until 8:00PM or so, because of their lighter charges. So I figured it was time to experiment with a low-voltage lighting set I bought last year and never got around to using. This article describes and shows some of the things I've learned. Note: This article is more like a journal than a "how-to" article. It is meant to encourage you to experiment, not to show you exactly how to wire lighting for your buildings or accessories. For one thing, you may not have access to exactly the same products I use, such as good source of cheap T5 wedge sockets. For another, you may bring experience or a box of spare parts to the project that I don't have. Please feel free to disagree with me, take other "tacks," and so on. In fact, if you come up with a good alternative way of doing anything I've described, here, please contact us and we'll include your comments and give you credit. (We already have some reader feedback at the bottom.) General Comments About Low-Voltage Landscape LightingLow-voltage landscape lighting systems have been around for decades with relatively few improvements. Most systems include:
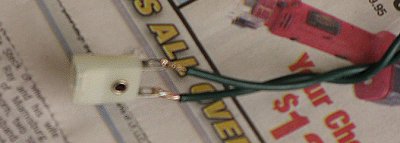
Many sets come with a combination of "tier" and floodlight lamps. The "tier" lamps look like flying saucers - to my eyes they're too obtrusive to use on the railroad itself, although they're great along paths. You can also find lamps that look like little lanterns or coach lamps or the like. Now if someone would come out with a low-voltage lamp that looked like a 1:24 lamp-post, I think they'd clean up, but so far I haven't been able to convince anyone to try this. (It is probably worth noting that most model railroad lighting accessories will glow if they're attached to a low-voltage lighting set, although they really do better at 16 volts. Wil Davis reminds me that, if 16-18v model railroading fixtures are too dim at twelve volts, you can usually find a 12-volt bulb.) Note: One other thing worth noting: most manufacturers of low-voltage systems insist that no part of the system come within ten feet of a swimming pool, pond, or irrigation system. I don't have an irrigation system, and the swimming pool is across the yard. However the goldfish are going to have to take their chances. Low-Voltage Landscape Lighting in my Back YardThe off-brand-set I bought in 2007 has similar features as the other sets that I've checked out, (including Malibu) although the features aren't always implemented exactly the same. The photo to the right shows the electronic components, plus one disassembled floodlight (top) and one disassembled tier light (center.) All components are made of plastic.The next photo shows the little wire with two ends on it that is the "guts" of the tier light. One end is the base and socket. You snap the socket into the base, stick Planning - Because I didn't want to try to use the "flying saucer" tier lamps on my railroad, I decided to try to use the set to illuminate the structures from inside - sort of a large-scale version of lighting cardboard Christmas houses with a strand of Christmas lights. I laid out the wire just to see how long it was (neither the box nor the instructions said). It was nearly 100' long. My railroad is about 60' long, so that gave me some slack. I put the transformer at the "back" of my railroad, at a place where I have other things plugged in already. I did not fasten it in place at first, but I made certain there was plenty of "slack" to fasten it when it was time.
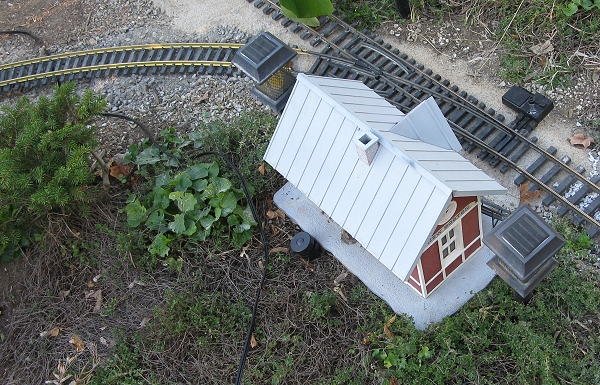
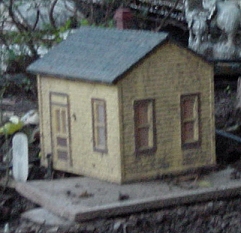
At first I thought that I might just use the system to light the two or three main "communities" of my railroad, and use solar lighting for the rest. But as I began weaving the wire around, I realized that I would have enough "slack" to serve all of my present "communities" and one more area that doesn't have any buildings now besides. The connecting wires that would connect the lamps to the low-voltage power cable were only about ten inches long. If you were placing tier lamps, you'd have to put the cable exactly where the lamp is going to go. I made a point of running the cable right alongside the buildings I planned to light. Again, I allowed plenty of slack. The photo above shows the New Boston station in its permanent location. Lighting it was a no-brainer, since it wasn't going anywhere. So was running extra cable in case I find low-voltage fixtures to replace my solar "lamp posts." But I was planning to move some other buildings to the area where that birdfeeder-church is sitting in this photo. So I ran an extra loop around the church to make certain I'd have plenty of room to light other buildings when they get into place. When I was satisfied that New Boston Station and environs were ready to go, I ran cable past the other buildings, communities, and one planned community. Then I decided I had enough slack where I would need it. And then I went back and pulled the cable underneath the track, something I could probably have done when I was first spreading the cable around and saved time in the long run.
You can see that the diffuser is fairly large. Dan Stenger of the Greater Cincinnati Garden Railway Society adapts white canisters from 35mm film to use as diffusers - that would help with the smaller buildings. Dan says they're getting harder to come by, though. Note: Wil Davis, of the Miami Valley Garden Railway Society, had several buildings installed right on the ground. So when he did this, he used the stake, too, standing the assembly in the ground the way you're "supposed" to but leaving the "flying saucer" part off. Again, the products you choose and your method of installing buildings may lead you to a different variation - there aren't any "rules" for this yet.
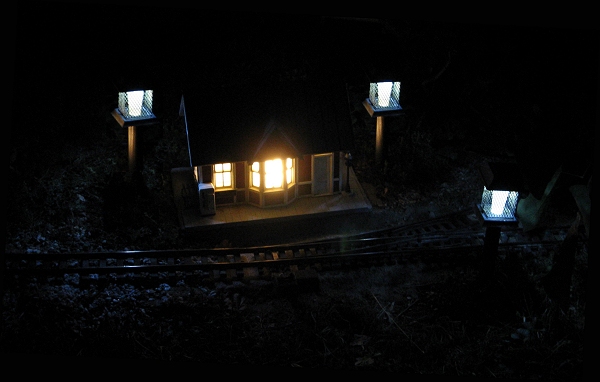
Next, I clamped the connectors for three of the buildings to the power cable. Then I hooked up the power cable and plugged in the transformer. The instructions said to finish all of my hookups before testing the system. Right. Then I put my thumb over the sensor, and nothing happened. Turns out that I needed to put the whole palm of my hand over the sensor. Finally, there were signs of "life." I could see New Boston Station's windows glowing from the transformer location, but I couldn't see the other buildings I had connected so far. So I wrapped a cloth around the transformer to make it "dark" and walked around to see if the other buildings were glowing. They were. I unplugged the transformer, hooked up a few more buildings and did the same test. One building wasn't lit. The instructions say that whatever you do, you must not fiddle with the connectors while the transformer is plugged in. Sorry. I picked the building up and fiddled with the connection, and it worked. By the time I had spent about three hours on this project, I had eight buildings lit, and lighting the rest didn't seem like it would be a problem, once I got them settled where I wanted them for now (I also had to repair a few before they went out again).
I was hoping to mitigate the excess light by replacing the 4-watt bulbs with 2-watt bulbs. After all, the instructions said they were available. But they're not, not that I can find easily, anyway. Moving to Individual Building Lighting
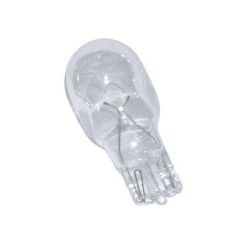
The effect was so nice, I figured I could use similar techniques to light my own buildings. The hard part would be finding twelve-volt bulbs and sockets that wouldn't cost a fortune.
When I got the sockets home and the first few buildings ready to light, I soldered 12-18" lengths of wire to each socket. (Note: The wire was recycled from non-working strands of Christmas lights in case you wondered. Click here for more information on that money-saving trick.) Then I had to figure out how to attach the socket. For buildings that had wooden walls, the choice was easy.
My downtown structures were a tiny bit more complicated. I had added lamp posts to most of them years ago, but never wired them. The bulbs in the fixtures were 18v, but they would glow at least if I hooked them into the system. Also, there were no interiors, so I needed to put curtains or blinds into the windows to keep them from looking silly once they were lit. (My articles on "Trashbashing" give more details on how these buildings were created in the first place).
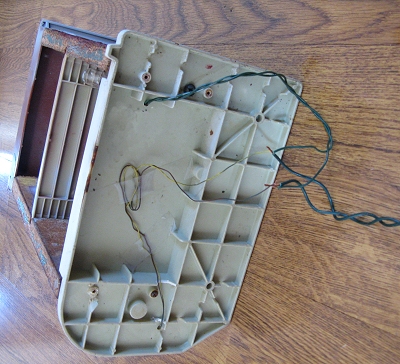
As the photo to the right shows, I also drilled holes through the floors, screwed a lamp socket to a wall, and fed the wires through.
I used only one lamp socket per building, even though the floors would obsure the lighting from one floor to the next, because I usually install these buildings back-to-back and their backs are open unless you put something over them. The lighting from the second floor of one building shines through the first floor of the adjacent building, and so on. I then spliced the wiring from the street lamp to the wiring from the 12-volt wedge socket. The photo to the right shows it before I soldered the joint and wrapped it in vinyl electrical tape. This way each building would have one lead that would connect to the low-voltage lighting system. (The street light bulbs were made for 18v, but they DO glow somewhat with 12 volt.)
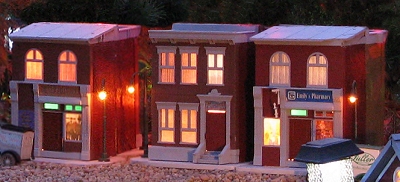
Cleaned up, with new graphics in the windows, these buildings took on a whole new life, even in daylight.
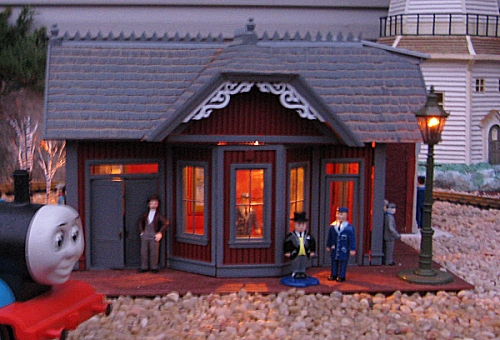
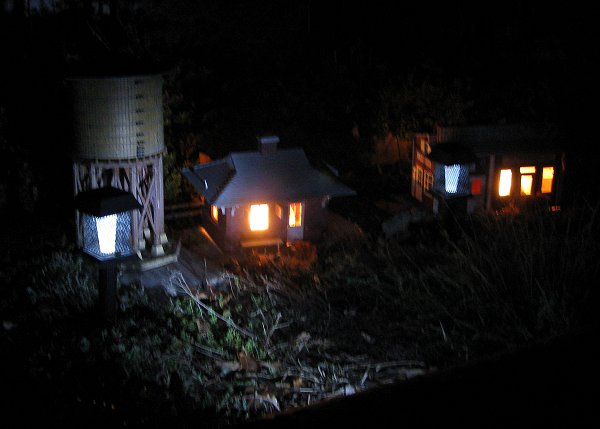
Going for Reinforcements - By the time I was halfway through with my building wiring project, it was obvious that I was going to go way over the number of bulbs it was "safe" to use on my low voltage system. Fortunately, WalMart had a Malibu set for 30% off. So I rerouted the wires from the first set to cover one half of the railroad, and use the Malibu set to cover the other half. I was a little surprised that the Malibu connectors are harder to use than the connectors on the cheap set. Otherwise, they were very similar, though. Lighting the Town - Earlier I had disparaged how bright the four-watt bulbs were in my structures, even glowing through some of the walls. However, used without diffusers, they seemed about right on the structures with truly opaque walls and curtains or blinds in the windows. Eventually I'll try to get around to revisiting the buildings I "lit" by setting them over a lamp and diffuser. They don't look bad, really, but the other ones look so much better. . Notes on Floodlights - as the solar lighting article recounts, I have experimented with solar-powered floodlights, and been fairly satisfied. My first set of low-voltage lights came with floodlights, but I was afraid they would be glaring. I also don't like the big-black-hockey-puck look that you see from the back. Finally I did break down and install a 4-watt floodlight that would shine on my town of New Boston from a relatively hidden position behind New Boston Station. To my surprise it's a little dimmer that I'd like. Maybe I should dig out one of those 10-watt T5 bulbs I bought by accident. The floodlight does help you see the little people and accessories in downtown New Boston, but you don't see them very clearly. That said, the towns lit by solar floodlights were even dimmer, and the stations that weren't lit by floodlights at all were very hard to see after dark. The most problematic are the stations, since they're near the "front" edge of the railroad and floodlights of any kind would likely be tripped or walked over. As charming as the buildings are after dark with their windows glowing, there was something "Twilight Zoney" about all those people standing around in darkness or near darkness. I wonder of those miniature 3-volt LED "floodlights" that Lemax sells for Christmas Villages would be any help. And finding lamp posts that actually shed illumination around my stations may help with those. At any rate, I have changed my mind about the usefulness of area lighting on a dark garden railroad. About Timers and Automatic Systems - Admittedly, it's a lot of fun seeing the communities come alive when darkness falls. But the electric sensor circuits on the transformers want to keep the buildings glowing until dawn. So I added a timer to turn the systems on at 5:00PM and off at some other time, usually about 10:00PM. That way the systems wouldn't turn on until dusk (whenever it was each day), but the timer would keep them from going all night long. Unfortunately, the light sensor on the Big Lots system was too sensitive. It had to be quite dark before the lights came on. This meant that you missed the best time of evening - twilight, when you could still see the buildings and see the windows glowing at the same time. I tried mounting the power supply various ways, but it was still "iffy" whether it was going to come on before it was pitch black outside. Okay, since I was using a timer anyway, I gave up and wrapped black electrical tape around the sensor. Now the lights come on whenever the timer says they will. The Malibu set I acquired later is better about coming on before gets completely dark. It is also plugged into the timer, but I usually allow its sensor to decide when to light up the town. For my open house, though, I covered the sensor just to be sure. Do You Really Need to Buy a Whole Set? - For my November, 2008 open house, I wanted to set a Thomas the Tank railroad up on the well cover, well away from my big railroad. I had already lit all of the buildings I was going to use, so I just had to figure out how to come up with a 12-volt system. I save "wall warts," whenever possible - left-over power adapters from telephone answering machines, broken kids' games, etc. You never know when you need to test a 4.7 volt fixture, or your kid is going to pick up some electronic device that takes a 9-volt power supply. Going through my "stash," I noticed that 99% of them are marked "Indoor Use Only." But one wasn't - the 1-amp, 12-volt recharger for a Toro lawn mower that fell apart a decade ago. Since I was using a timer, I didn't need an electric sensor, and since I was only going to have four buildings on this "railroad," I didn't need a lot of power. I cut off the plug from the adapter, leaving as much of the cable as possible. Then I stripped the ends of the leads from all four buildings and a three-foot length of lamp cord. Then I used screw-on connectors to wire all four buildings directly to the adapter's wire.
The result was quite charming. That said, I wouldn't recommend this sort of solution for anything larger than the railroad in the photo, and I would try to keep the adapter sheltered from the weather and the wires protected from flooding - this kind of adapter doesn't have a circuit breaker. If water causes a short, that's the end of the power supply. (Don't ask me how I know). Still, if you're starting out with lighting your railroad's buildings, I'd recommend buying a set until you get a sense for how it all goes together. Still Looking for 2-watt T5 lamps - Also, I'm still looking for 2-watt 12-volt T5 wedge lamps. I wonder if I could get away with 4-watt 16 volt lamps or some such? (Wil Davis says he has tried similar solutions with good results, underpowering bulbs to get a dimmer light.) What About Lamp Posts? - I'm also keeping an eye out for low-voltage "lamp posts" that can replace the solar ones on my railroad for winter service. But I won't replace my solar lamp posts with flying saucers just to get a longer light cycle - even I have my limits. :-) I'll keep you posted. More to ComeI still have some building to wire "properly," now that I've decided what "properly" is for me. Of course, I may discover something else useful in the meantime. But I wanted to get these ideas "out there" to encourage you to try anything along this line yourself. I'm hoping we can collect a "best practices" that takes the guesswork out of this sort of thing for the next generation of garden railroaders.Your Input NeededFinally, if you've done something that outshines our attempts in this or any other area, please let us know and we'll publish any ideas and photos we get, giving you credit, of course. Reader FeedbackDave Smith, of Long Island writes:As for the street lamps, how about using the LEMAX Christmas Village old fashioned street lights? I believe they're 3V so they would have to be either run with a resistor OR enough of them put into the circuit to reduce the current. I have found the Malibu outdoor lights too white for layout and building lighting. There are colored bulbs available but they are a bit expensive and in colors like blue, red, green that we really don't need (but there is a yellow colored one). A neat item I found years ago at Home Depot but haven't seen since, are little vinyl caps that fit over the light bulbs and change their color. I used a yellow one over a white bulb and it really gave the building a nice glow. I also used a yellow one over a yellow bulb and it was a bit too much yellow. Unfortunately, as I say, I haven't see them again at HD or Lowes. I buried my Malibu outdoor lighting wires for over 10 years and had no problems. Perhaps one of the off brands don't have the same durability? This is the time of year when you can get some really good deals on outdoor lighting sets that have been damaged by water (in the garden center) or perhaps were returned by customers and don't include all the diffusers but are still useful to us if they have the transformer, sockets and connecting cable. I was surprised to read that your solar powered spotlights worked well for you! I bought a set of two from Harbor Freight and was disappointed in their brightness and ability to illuminate a specific spot on my layout. Perhaps I need to look at them again and see how they're focused. Thanks for sharing the new article! - Dave Richard Friedman, of Sacramento, Callifornia writes: I've got 12v garden lights all through the backyard and railroad. And I've got several buildings around the layout. So I've added lights to the buildings from time to time using the 12v power supply and 16v Radio Shack screw in bulbs. The cable has been generally left above ground hidden in leaves and debris. Wire connections were just twisted together and wrapped in tape, until the tape fell off and the wires untwisted by themselves. This weekend, I added wiring to three nearby buildings using pvc pipe as conduits, screw in sockets, and these bulbs. Total cost was maybe $10 for the whole deal, even if I had to buy all new. I didn't, just went looking through my parts bins for sockets and bulbs. I think I paid more for the pvc elbows than I did for the pipe.
I now have a light tree that I'll drop into a small trench, then place the buildings over them, connect the lights to the main feed with suitcase connectors, and see how it looks. I haven't taken any pictures of any of this, but may document it for our SVGRS Flyer.
Simple, low cost, and relatively fool proof. With screw-in bulbs, they'll be easy to replace when they burn out. All connections are soldered, so I won't have wire failure, and the conduit might not be necessary, but it'll keep the wires dry. I have had some problem with suitcase connectors, but I don't want to cut into the main feed wires. Just squeeze 'em tighter, and they sem to work fine.
The project work out very well, I think. I built a small "tree" of pvc pipe with six inch risers and the light sockets taped to the riser. The sockets are soldered to small wires that are soldered together so the bulbs are in parallel (one burns out the others stay lit). They are then soldered to a piece of low voltage lighting cable that is wired into the main circuit in parallel with "suit case connectors."
Because the bulbs are 16 volt, and the power supply is 12 volt, the bulbs glow a little yellow, and are NOT super bright. I think they look great!
I'll do a search for the others and send them on. I'll try a little long exposure shots to see if the lighting shows any better!
John, in Iowa writes:
In reading your article on using low voltage landscaping lighting in the railroad, I wanted to submit a comment. I'm currently constructing my own garden railroad and am installing LEDs in my buildings to be used with small low voltage transformer I didn't need in the yard.. I starting using LEDs in my actual landscaping as a cost savings measure - I was tired of purchasing the expensive T5, MR11 & MR16 bulbs and replacing them 2-3 times yearly. The LEDs are approximately two to three times the price, but have lasted for more than two years so far and should last another two to three more.
For my buildings, I have been purchasing loose LEDs and the appropriate resistors and wiring them myself, but you could install the wedge base sockets as well. As I creating my own, I've found the 2-3 bulbs per building is extremently bright for lighting a window, and they can be somewhat directional so you don't have the "glow" with a plastic structure.
Another advantage of the LEDs is the much lower power draw requiring less electricity and dramatically increasing the number of fixtures you can run from a power supply. An LED will draw less than 1/4 watt, so you run 20 LEDs in place of the one T5 bulb.
There are several LED calculators on the Internet to help you size the resistors for the number of bulbs you will be using in each fixture.
|
|
| 
|
 |
 |
|
 |
 |
Note: Family Garden TrainsTM, Garden Train StoreTM, Big Christmas TrainsTM, BIG Indoor TrainsTM, and BIG Train StoreTM are trademarks of Breakthrough Communications (www.btcomm.com). All information, data, text, and illustrations on this web site are Copyright (c) 1999, 2000, 2001, 2002, 2003, 2004, 2005, 2006, 2007, 2008, 2009, 2010, 2011, 2012, 2013 by Paul D. Race. Reuse or republication without prior written permission is specifically
forbidden.
Family Garden Trains is a participant in the Amazon Services LLC Associates Program, an affiliate advertising program designed to provide a means for sites to earn advertising fees by advertising and linking to amazon.com.
For more information, please contact us

 |  |