| |||
 |
 |
 | |
 |  | ||
 |  | ||
 |  | ||
 |  | ||
| |||
|
|
|
| |
|
| | ||
| | ||
| | ||
| | ||


| Building a Simple Foam ViaductIn early 2007, we were invited by Holden Arboretum, in Kirtland Ohio to present some "how-to" sessions on Garden Railroading. We were also asked to use Thomas The Tank(r) and his friends to interest the younger visitors. I decided want to represent one "scene," from the Thomas stories - the viaduct that Thomas crosses no matter where he's going in all of the earlier videos. Because I was in a hurry, I took some shortcuts I won't take the next time, but I did come up with a very practical project you could add to your railroad with about a day's work. So I'm putting the project here, warts and all. If it looks familiar, it's because parts of this project have already been reported on my blogs and on my clinic report.To create the viaduct, I thought I'd use an inexpensive material that I've seen other folks use for viaducts with some success - insulation foam. The next time I was at the Big Box hardware store, I bought a piece of 2"x4'x8' Dow Corning pink insulation foam ("Modular 150," if that helps).
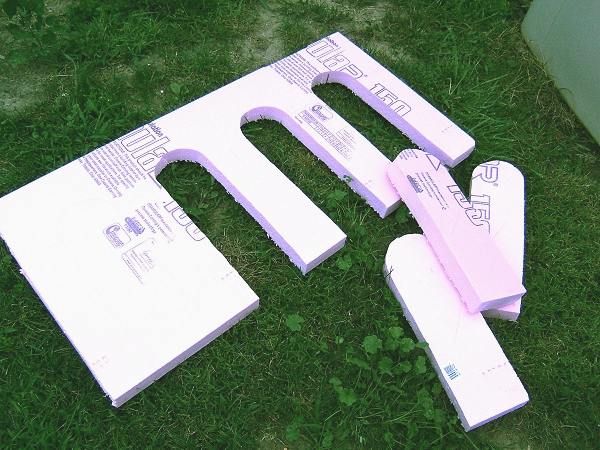
I also worried a little about how I was going to cut the shape of a viaduct into the foam. Cutting styrofoam with many tools results in a very hashed-up looking edge. I know folks who have those styrofoam cutters that use a heated wire (like an oversized cheeze slicer), but I didn't have one, or know where to get one big enough for this job quickly. So I also picked up a new set of saw blades for my hand-held Black & Decker jig saw. I got the ones with the most, tiniest teeth I could buy - it was labeled for "coping" and "scrolling." The foam piece had "snap lines" running lengthwise at 16", 24" and 32" from the edge. These are 1/4" grooves that you can deepen with a knife to snap the form to a width appropriate for house framing. When I got the foam home, I used a knife to deepen the 24" snap line, broke the board in half, which left me with two 2"x2'x8' pieces. I stuffed them under the deck so they wouldn't blow away before I got back to the project. Deciding on the Overall SizeI thought that if I made the viaduct 5' long, it could fit under one of the 5'-long pieces of track I was going to use, once the roadbed was raised. But then I realized that I wasn't taking the supports into account. I'd really only have four feet and some inches to work with. So I cut one of the insulation boards into two 2"x2'x4' pieces and started figuring out how to design a 2'x4' viaduct that would get the idea across. For one thing, I wasn't planning on reinforcing the foam like I might for a permanent installation, so I knew I couldn't make the "legs" of the viaduct too long and narrow without risking a break that might be hard to fix three and a half hours away from home. Also, each piece still had a "snap" line running lengthwise, eight inches from the edge. I decided that, if nothing else, I would turn the pieces so that the snap lines weren't across from each other - otherwise there would be a built-in weak spot in the finished structure.Finalizing the Measurements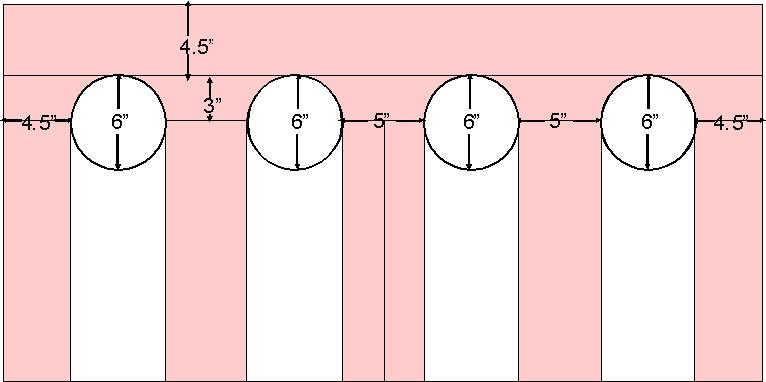 I took a coffee can, a Sharpie (fine-point permanent marker), a yardstick, and a framing "sqare" to the back yard. I kept repositioning the coffee can and trying to visualize what the final result would look like if I used the can's 6" diameter to measure out four or five cuts in the 2'x4' piece of foam. I took a coffee can, a Sharpie (fine-point permanent marker), a yardstick, and a framing "sqare" to the back yard. I kept repositioning the coffee can and trying to visualize what the final result would look like if I used the can's 6" diameter to measure out four or five cuts in the 2'x4' piece of foam.
After several tries, I figured that if I had five posts (four cutouts) that would give me about the right width of posts as well. I also figured out that spacing the 6" arcs five inches apart (OD) would leave enough space on the ends to keep the end posts from being too fragile. Using the "snap line" and my square, I drew the guidelines shown in the drawing to the right. I spaced the arcs 5" Cutting Out the ProfileWhen I was certain I had marked one side properly, I put the "scrolling" blade into my little jig saw and started sawing. To my surprise, it not only cut through smoothly, it also left no mess, except for a small hail of tiny bubbles that the wind quickly blew under my deck for a future home-owner to wonder about. (Later I learned that my dad had used the same sort of blade on insulation foam he had cut to build a mountain on his HO railroad decades earlier, so I'm probably telling most of you something you already know.) In fact, my jig saw tore through the material so fast, I actually messed up a couple of the curves, because I slightly overshot them. Also, although I had my B&D jig saw set to make a 90degree cut, it was a couple degrees off, so the cut was wider at the "back" than at the "front." If I get around to using the rest of the foam board to make another viaduct, I'll spend more time tweaking things before I start cutting. But I was running out of time to get this ready for the arboretum project.
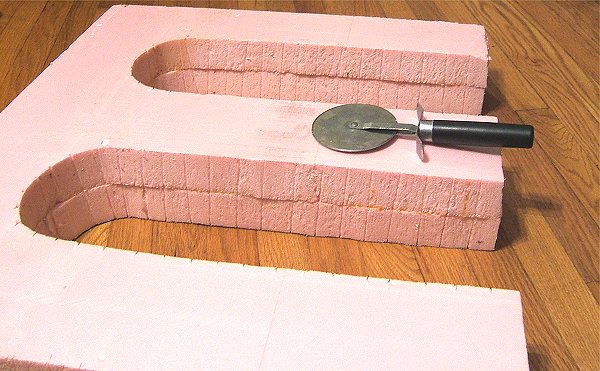
Carving the Mortar Lines
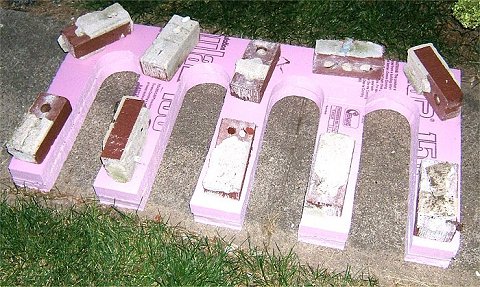
I carved some more-or-less horizontal lines with the pizza cutter, being careful not to cut most of the way through, which was possible with this thing. (Again, in a more serious project, I would have used a yardstick and straightedge to premark the cuts. Then I used a knife tip to make the shorter vertical lines. Unfortunately, it left wedged-shaped indentations, rather like cuniform. I have since purchased a 1/2" wood chisel that I should be able to hold at an angle to put symmetrical indentations in without having to cut through the surface. So if and when I get around to using the other half of the viaduct to make a more serious model, I'll use that and post photos here. PaintingI then painted the foam with two coats of acrylic house paint (spray paint and some oils will make it dissolve; latex house paint would work, too). Wanting to get a more weathered look, I did try a little spray paint on when I was pretty sure the foam's surface was sealed. But the foam dissolved slightly at several points where the house paint apparently hadn't quite sealed it. So after it stabilized, I wound up giving the viaduct another smooth coat of house paint. Maybe next time, I'll try to find an acrylic spray to do the "weathering."
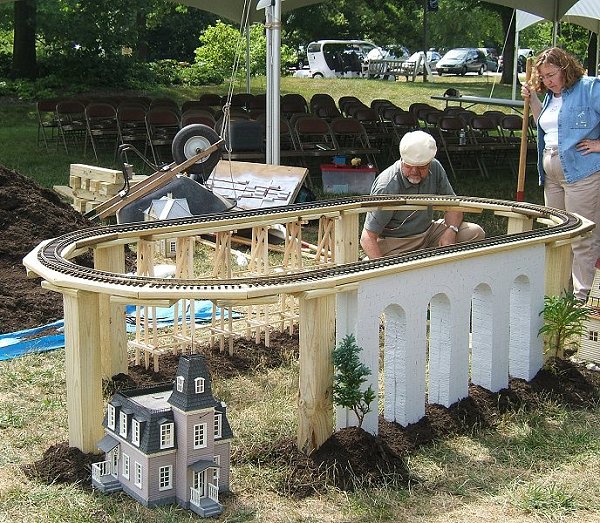
Did it Work?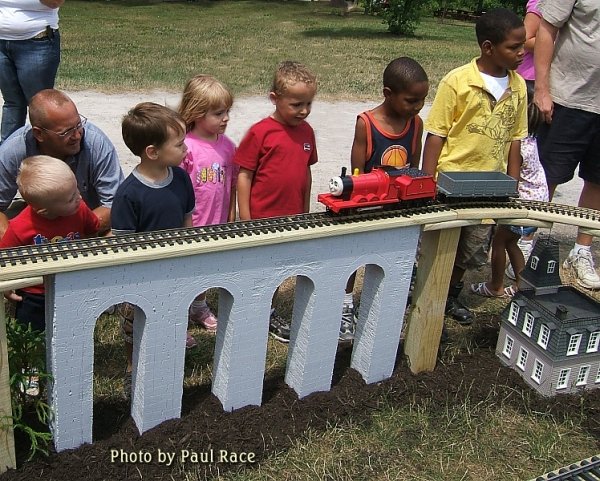 As you can see in the photo to the right, it held up the trains it was supposed to. And to my delight, many of the children who saw it said things like "Look, Mom, it's the viaduct!" That told me I had made a good choice of things to model. Now that the Harry Potter Hogwarts' Express(r) has come out in O gauge, I can't help thinking how nice it would be to make a viaduct for that train. As you can see in the photo to the right, it held up the trains it was supposed to. And to my delight, many of the children who saw it said things like "Look, Mom, it's the viaduct!" That told me I had made a good choice of things to model. Now that the Harry Potter Hogwarts' Express(r) has come out in O gauge, I can't help thinking how nice it would be to make a viaduct for that train.
Will It Last?At the moment, this viaduct is in the garage waiting to be reused on a demonstration railroad later this year. It made the trip to Kirtland and back twice, and withstood 2 installations and deinstallations (if that's a word), as well as more than one youngster crowding against it. In fact, it wound up being far sturdier than I expected. I'm still not quite sure the hash-marks that denote mortar lines are quite sealed from the weather, so if I was going to use it in permanent installation I would paint it again more carefully to make certain it was sealed.That said, Miami Valley Garden Railways members Denny and Judy LaMusga have a very long viaduct that they built out of lumber but covered with a carved foam veneer, and it's been in place for years. According to Denny, the worst problem isn't the weather, it's tiny fingers poking at the thing to see if it's "real." So he controls access so that most of the foam viaduct is out of reach of little hands, and it requires fairly little maintenance. More to ComeI still have the other half of the foam, and hope to make a more careful attempt in the coming months. But I wanted to get some basic ideas out there now for folks who would like to add a pretty simple, but potentially impressive feature to their garden railroad, with only about a day's work.I also have friends who have made viaducts many other ways - if any of you want to contribute an article (or a writeup and photos that I can make into an article), let me know. Again, if you have questions we haven't addressed, or tips or photos you'd like to share with our readers, please get in touch.
|


|
|
| 
|
 |
 |
|
 |
 |
Note: Family Garden Trains?, Garden Train Store?, Big Christmas Trains?, BIG Indoor Trains?, and BIG Train Store? are trademarks of Breakthrough Communications (www.btcomm.com). All information, data, text, and illustrations on this web site are Copyright (c) 1999, 2000, 2001, 2002, 2003, 2004, 2005, 2006, 2007, 2008, 2009, 2010, 2011, 2012, 2013 by Paul D. Race. Reuse or republication without prior written permission is specifically
forbidden.
Family Garden Trains is a participant in the Amazon Services LLC Associates Program, an affiliate advertising program designed to provide a means for sites to earn advertising fees by advertising and linking to amazon.com.
For more information, please contact us

 |  |

 I figured if I bought the 2" stuff, it would be wide enough to look decent when I doubled it.