| Please Read: How to Help Our Site at No Cost to You - Some of our articles contain recommendations for products we like and vendors we personally trust. Some of those vendors may pay us a very small commission if you click on a link and buy their products. This costs you nothing at all and helps offset the costs of what we do. So if we point you to something you decide to buy later, please make certain you come back through our site and click on the link directly. Thanks.
|
| This Page is Cookie-Free Zone - Except for discussion forums that you have to expressly registor for, none of our article pages or newsletters use cookies of any kind. Some of the vendors we link to do, but that won't affect you unless you click on a link to their pages. If you sign up voluntarily for our newsletter or our discussion forum, our sites will necessarily save some user information as part of that process. Click here for details. Your continued use of this page indicates that you agree to our policy.
|
So you don't have all that much time anyway. You're lucky if you get a few hours a week to work on your garden railroad, much less to run trains. And you can't help feeling the urge to slap some track down and get any old thing running.
 Try to resist, or else put a "test loop" in some corner away from the planned location of your future empire. Otherwise you may be designing problems into your railroad that will hamper your operations for years to come. Garden railroaders who have taken the time to plan and prepare effectively spend less time rerailing and maintaining, and more time enjoying their railroads. Try to resist, or else put a "test loop" in some corner away from the planned location of your future empire. Otherwise you may be designing problems into your railroad that will hamper your operations for years to come. Garden railroaders who have taken the time to plan and prepare effectively spend less time rerailing and maintaining, and more time enjoying their railroads.
Even if you're already running trains, you may be able to make changes that improve operations and reduce your maintenance load. The following list includes many pointers that experienced garden railroaders have picked up. No one follows them all to the letter, but you should find several that are helpful to you.
When Planning Your Layout:
Take the following reliability and maintenance considerations into account when you are designing your track plan and railroad logistics.
- Use the widest curves possible in your location. Trains look better and run better on wider curves. If you are using pre-formed track (recommended for beginners), your choices for track diameter are 4, 5, 8, 10, and 20 feet. 8'-diameter curves are the recommended minimum for many North American standard gauge pieces; 10'-diameter curves or greater are recommended. Add at a foot on each outside edge for supporting framework, borders, etc. Yes, on paper, curves this wide may seem like a ridiculous waste of space, but remember that ten feet is barely longer than three 29:1 heavyweights. If you really feel you need to squeeze an empire's worth of track into an 10x12' space, consider using a smaller gauge (like O) or modeling an "old-timey" or industrial railroad with "shorty" gear.
-
Elevate your track if possible. Many people who've built raised "beds" to elevate their track 12" off the ground now say they wish they'd gone for 24" or 30" instead. Not only does this improve viewing and drainage, it also keeps you from having to lay on the ground to blow grit out of your turnouts. On the other hand, having a raised bed so wide you can't reach part of your mainline defeats the purpose. If you must have mainline trackage you can't reach from the outside of the raised bed, consider a horseshoe- or donut-shaped bed with a bridge you can crawl under or a camouflaged stile you can climb over, so you can work comfortably on the interior of the bed as well as on the outside. (Some folks cleverly disguise this interior workspace as a ravine or dry riverbed).
- Choose a track system with good mechanical and electrical
connection. Many garden railroaders use add-on rail-joiners,
soldering, or other methods for ensuring good connections.
However, some track brands have pre-drilled rail joiners and rails
so you can make a fairly solid connection without expensive add-ons.
AristoCraft track also has screws on the underside to which you can
attach jumper wires so easily that it's almost a sin not to use them.
Even if you're confident of your electrical connections overall,
consider adding jumpers to long stretches of track. Alternatively,
some folks claim that battery power and radio remote control eliminates
the problems of poor track conductivity. That discussion is
described in the "Large Scale Power and Control" article on the Family Garden Trains "Primer"
page.
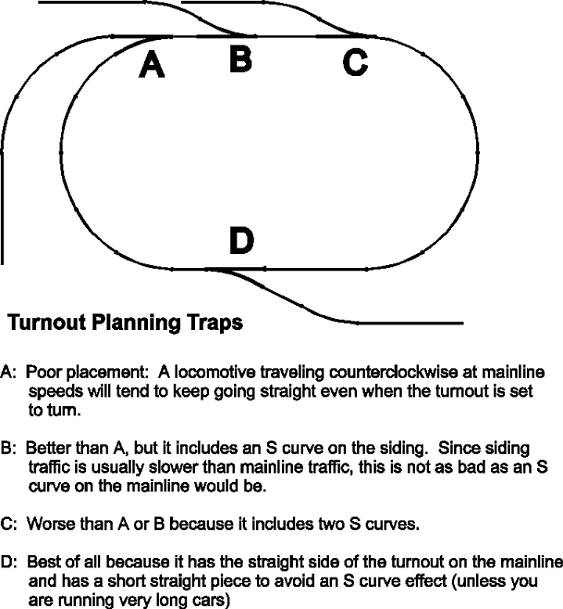
- Plan sidings carefully. Place the straight leg of turnouts on the mainline. It's tempting (and unfortunately common) to add a spur on the outside of a loop by replacing a curved piece with the curved leg of a turnout. Don't do it. Fast-moving locomotives occasionally take the straight path through turnouts (or split the difference), whichever way the points are turned.
- Place your turnouts within easy reach of typical operating positions. Even if your turnouts are working fine, you should be able to verify visually that they are doing what you want them to. Not to mention that it's a whole lot easier to install and maintain turnouts that are within easy reach.
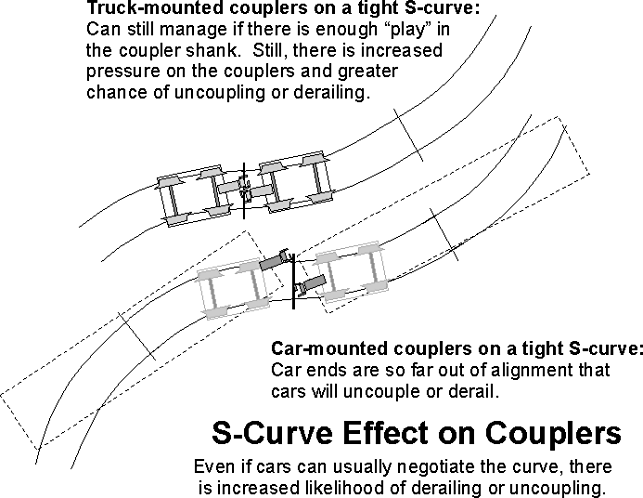
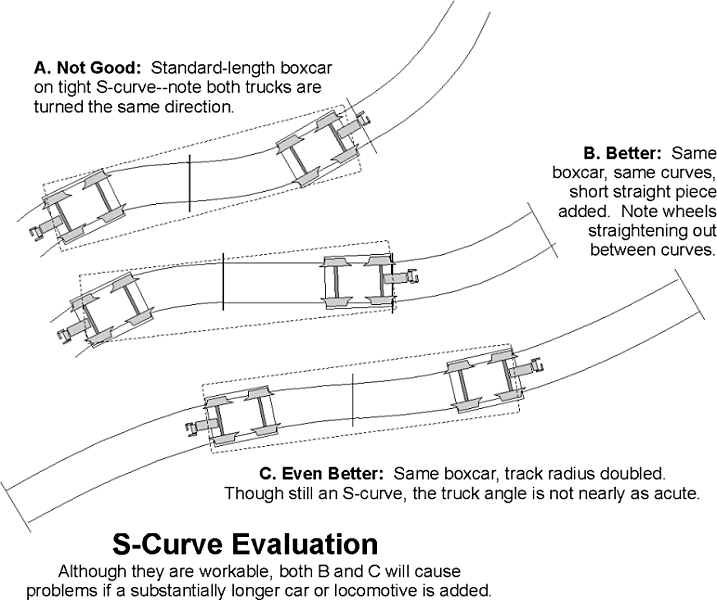
- Avoid S curves, especially with tight diameters of track. Tight S curves cause coupler shanks of adjoining cars to swing in opposite directions, magnifying the chances for derailment or uncoupling. Some steam locomotives with long wheelbases like to climb right out of S curves onto the ties.
The curves in the following illustrations are exaggerated to make a
point, but the point is valid - no, critical.
Even "loose" S curves can cause jerky operations and occasional derailments. Inserting a short piece of straight track between two curves of opposite direction or using much larger curves may reduce the potential problems.
For a "rule of thumb" evaluation of a stretch of track, run the longest car or diesel you plan to use slowly through this track segment and look for any point at which the trucks are turned in parallel at a significant angle to the car's center line (Trucks turn in opposite directions on "normal" curves). The greater the maximum angle the trucks reach while turned the same direction, the more likely this curve is to cause problems. Conversely, if the back wheels seem to "straighten out" before the front wheels launch into the next curve, you are probably all right, until you buy something longer, at least.
 Arrange your layout so you can view significant operations, if not most of the track, from a typical operating position. If you don't notice a derailed or uncoupled car until the train has traveled another twenty feet, it could cause additional problems, like snagging on a turnout and causing the whole train to stretch tight around a curve and fall over (with any luck, into the pond). Arrange your layout so you can view significant operations, if not most of the track, from a typical operating position. If you don't notice a derailed or uncoupled car until the train has traveled another twenty feet, it could cause additional problems, like snagging on a turnout and causing the whole train to stretch tight around a curve and fall over (with any luck, into the pond).
- Consider "easements." Real railroads "ease into" turns. The
mainline begins to curve slightly before it reaches the point where
it must close to the final minimum radius of the turn. This reduces
lurching and the chance of jumping the track. Designing real
easements is tricky, but you can get some of the advantages by using
larger-diameter curves to lead into tighter curves. For example, you
can use a 10'-diameter curved piece to lead into a 5'-diameter curve,
or a 5'-diameter piece to lead into a 4'-diameter curve. In a simple
oval, such substitutions work very well, since all of these pieces
curve 30 degrees. Mixing and matching other diameters gets more gets
more interesting, because the track pieces don't curve the same
amount. Still, you might be pleasantly surprised how much nicer a
railroad that must use tight curves overall looks and runs when wider
curves lead into those curves. Make certain that all your track in
that segment is from the same supplier, though, or it will spoil the
visual effect.
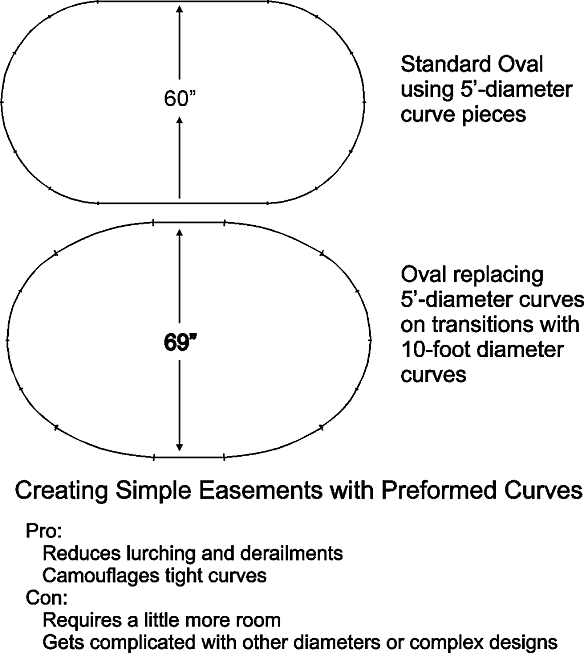
The following diagram show a simple oval of 5'-diamter
track before and after a few pieces of 10'-diameter track are inserted
at the "easement" points. You'll notice that the track doesn't take up
much more room from "front-to-back," but the right-of-way is much smoother. In this case, I get many of the benefits of wide-radius track on a railroad that is only about 12' deep (left-to-right in this photo). A not-to-scale drawing of the way I incorporated this feature on my railroad is below.
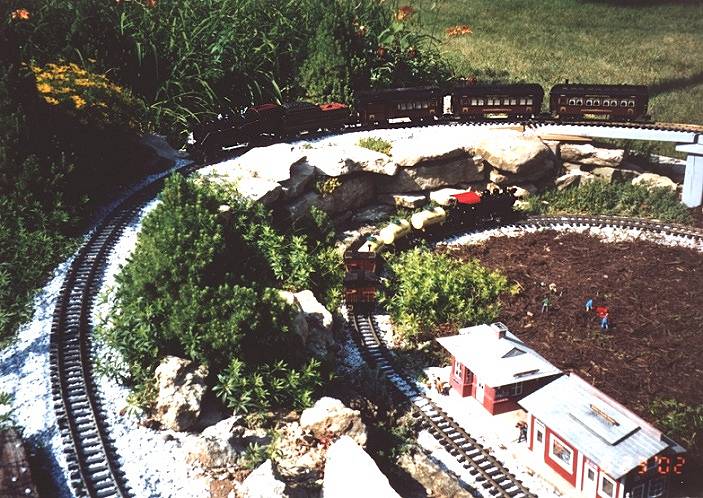
The following photo shows two loops on my railroad, the New Boston and Donnels Creek, that use combinations of curves to create an easement effect. The lower loop uses 10'-diameter curves to lead into 5'-diameter curves (what LGB calls R2 curves). The upper loop uses
20'-diameter curves to lead into 10'-diameter curves. The math isn't quite the same, as the
20'-diameter curves don't curve thirty degrees, but the result is smooth and impressive. Click on the photo for a larger version.
 The drawing to the right shows a "not-to-scale" plan of the loop shown above. (The station in the photo is the "Fort Tecumseh" station on the drawing.) Due to its location in my side yard, the loop couldn't be more than 12 foot deep. You should be able to see that I was able to incorporate long sweeping curves "left to right" while being "stuck" with tighter curves "front-to-back." For more information on my track plan, click here. The drawing to the right shows a "not-to-scale" plan of the loop shown above. (The station in the photo is the "Fort Tecumseh" station on the drawing.) Due to its location in my side yard, the loop couldn't be more than 12 foot deep. You should be able to see that I was able to incorporate long sweeping curves "left to right" while being "stuck" with tighter curves "front-to-back." For more information on my track plan, click here.
- Use shallow grades. Your mainline probably shouldn't rise or fall any more than, say, two inches per one hundred inches of length (2% grade). Otherwise your trains will labor up one stretch and careen down the next. Grades on curves cause even more problems than the same grades on straight segments. You can get the effect of steeper grades, without the operational hassles, by having the terrain rise and fall around a fairly level mainline, or by having discrete loops of track at different levels. In addition, if you do have any steep grades, make certain that your roadbed eases into and out of the grade, so that long cars don't imitate suspension bridges or pop "wheelies" when they are heading into or out of the grade.
- Keep rails level or slightly banked. Make certain that the track is level from rail-to-rail as well as end-to-end. If you want to get really creative, you can bank your turns slightly, but avoid situations where the inside rail on a curve is higher than the outside rail. (S-curves on slopes frequently cause this problem.) In addition, eye the right-of-way occasionally to make certain that shifting ballast, undermining rodents, or other forces of nature haven't changed the rail-to-rail level without your knowledge. During operations, watch for track segments on which cars seem to sway back and forth more than "normal."
- Avoid foot traffic patterns across the right-of-way. Otherwise, it's only a matter of time before some adult who isn't paying attention, or some child imitating a bridge kicks a locomotive across the yard. If you absolutely can't avoid grade crossings with 1:1 traffic, be certain to assign a human crossing guard when you have visitors.
- Include camouflaged footpaths for maintenance. If you have no maintenance access paths, you will eventually kick or step on something important when tip-toeing through your scenery. If your maintenance paths are too obvious, visitors will be tempted to use them. In addition, visitors will use things that aren't paths but look like paths, so be careful how you arrange things. I once had a nice planting of woolly thyme on a terraced wall that a stream of visitors took for steps. . . .
 When Preparing Your Equipment: When Preparing Your Equipment:
Sad to say, some garden railroad equipment is not entirely ready for serious use out of the box.
- Install working couplers. The knuckle couplers which come "stock" with most garden railroad equipment rely on gravity to stay closed. Unfortunately, uneven track and other factors can cause those mechanisms to work their way loose after a while, eventually stranding cars on the track to be clobbered by the next locomotive coming through. In contrast, couplers which are springloaded in both open and closed position tend to be much more reliable. Unfortunately, such couplers are not often compatible (or very compatible) with other brands, so a decision to standardize on a more reliable coupler can cost you some money.
- Install metal wheels. Plastic wheels deposit black powder which coats your track and the pickup wheels on your locomotives. When you replace all the plastic wheels on your rolling stock with metal wheels, you'll notice that your track and your locomotives' pickup wheels need cleaned less often. In addition, the lower center of gravity and reduced wheel-to-track friction help your trains run smoother and stay on track better. (Not to mention that clickety-clack sounds much nicer than thunkety-thunk.) When I price a car now, I mentally add the price of metal wheels and new couplers (as needed), then decide if I want it that much. Based on this metric, that used flatcar I got for $5 really cost me almost $20 by the time I was done equipping it for reliable operation.
In the meantime, if you have to keep some plastic wheels for now, try to avoid using those cars a lot on very hot, sunny days, when the hot brass track is especially brutal on plastic wheels.
- Use track and wheel gauges. After your track is down and any time it is damaged (say by people accidentally kicking it, trees falling on it, etc.,) make certain that the rails are still 45mm apart. And as each piece of rolling stock comes in, check the wheel distances. You'll be surprised how many "name-brand" pieces ship with wheels that are three or four millimeters out of gauge. If you mix and match brands, make certain your coupler heights are reasonably close, too, or they may not stay coupled on rough track.
When Maintaining Your Railroad:
- Keep your track clean. Even if you use batteries or live steam, examine the track periodically for tree sap and other natural substances that can gum up your wheels and lead to other problems. If you use track power, cleaning the track periodically, using metal wheels, and keeping vegetation from overgrowing or closely overhanging the track will reduce arcing on pickup wheels, so they will need less maintenance.
 Periodically inspect the right of way. Look for twigs, leaves and other obstacles blocking the track or jamming turnouts. Also look for places where the roadbed has shifted and the track is no longer level, where track needs reballasted, and so on.
- Perform periodic maintenance periodically. Everybody knows they're supposed to, but hardly anybody does it. If you don't, you may find yourself having to do some emergency pickup wheel cleaning or something if company drops over unexpectedly.
- Have backup equipment on hand. Even if it's a handcar, have something ready at all times to throw on the track if your prize locomotive suddenly acts up or takes a header when you have visitors over.
In Summary:
Every garden railroader has to make some compromises that "violate" some of the above "rules." The point is to avoid potential problems where you can instead of inadvertently designing them into your layout. And the next time you visit that layout I once saw, where the mainline started up a steep grade right before it went through the curved leg of a turnout and into an S-curve, you'll know to leave your "good stuff" in the trunk.
Best of luck,
Paul
|