 | |||
Family Garden Trains, click on any link below: | |||
|  |  | |
 |  | ||
 |  | ||
 |  | ||
 |  | ||
Written by Paul D. Race for Family Garden Trains(tm)

| |||
Family Garden Trains, click on any link below: | |||
|
| | | |
| | ||
| | ||
| | ||
| | ||
Written by Paul D. Race for Family Garden Trains(tm)
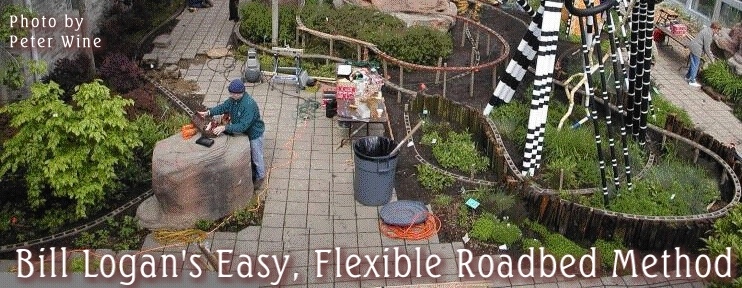
 | HDPE Flexible RoadbedBy Paul Race (with major input by Bill Logan)Part 1Paul speaking: About 2002, a Columbus-area architect named Bill Logan began developing a construction method for raised roadbed that:
In 2002, Bill was on the committee to design a public display layout for the Franklin Conservatory in Columbus. With his architectural background and love for engineering challenges, he wanted to find a better way to install raised roadbed than the "tried and true" post-and-stringer method most garden railroaders - including professional installers - had been using the 1980s. After some engineering calculations and some trial and error, Bill came up with a simple process almost anyone should be able to use to create smooth, strong roadbed that conforms to any reasonable curve (and some unreasonable ones, if you ask me). Bill gave me constant input as I put this article together, including several passages that I will try to annotate. The construction ideas are all Bill's; my contribution was to communicate Bill's ideas in a way most people can understand. Update for 2006Since Bill helped me put this article together, I am aware of dozens of other railroads that have been constructed this way. No one has reported a serious problem, and many people have reported their delight with the finished product. Bill has himself has advised several homeowners and at least one shopping center on building beautiful, complex railroads that use this method. (If you ever get to the Columbus, Ohio area, check out the "Easton Express" at the Easton Town Center, not far from Columbus' airport.)In March, 2006, I reformatted this article to make it easier to read, and I made many minor changes and corrections. I also added two photos of "test runs" on the Franklin Conservatory project. I hope soon to add example and construction photos from other projects to give readers a different perspectives on some of the tasks involved, so stay tuned. Please let me know if you need any additional information or note any additional changes that should be made. Thanks in advance - Paul |
What Bill Came Up With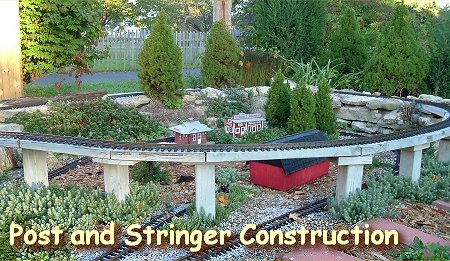 When Bill started his research, most raised garden railroads used post-and-stringer construction that consisted mostly of 2x6 pressure-treated lumber fastened on 4x4 posts. Although Bill was dissatisfied with the amount of waste you get from using 2x6"s, he was more "put off" by the appearance of the 2x6"s on the "finished" product.
Specifically, Bill didn't like the way they jutted out beyond the tie width, or the fact that they are solid when viewed from above, which makes them look silly when you try to disguise them as bridges or trestles. When Bill started his research, most raised garden railroads used post-and-stringer construction that consisted mostly of 2x6 pressure-treated lumber fastened on 4x4 posts. Although Bill was dissatisfied with the amount of waste you get from using 2x6"s, he was more "put off" by the appearance of the 2x6"s on the "finished" product.
Specifically, Bill didn't like the way they jutted out beyond the tie width, or the fact that they are solid when viewed from above, which makes them look silly when you try to disguise them as bridges or trestles.
While Bill was concerned with structural integrity, he also knew that he would be working with many non-carpenters on the Franklin Park project. He wanted a method that small teams without a master carpenter could implement consistently throughout the project. The system Bill developed could be called "open stringer;" it still uses posts and stringers, but the finished installation looks far more "open" from above. In fact, the roadbed looks something like flexible "ladders" for which the "rails" and "rungs" are prepared in the "shop" and assembled to fit onsite. |
What Bill Used Looking past traditional materials, Bill examined plastic-, and plastic-enhanced lumber-replacement products. Looking past traditional materials, Bill examined plastic-, and plastic-enhanced lumber-replacement products.
Bill says that per foot of installed track the "expensive" material is actually cheaper when using his system: in central Ohio, about $2.25/foot versus about $2.50/foot for roadbed made with pressure treated lumber. |
 | How the Method WorksThe following drawings show how Bill rips the "lumber" apart and reassembles it in structural members that are VERY strong, and very flexible until you decide where they should go and fasten them in place. (Note: These drawings are not remotely to scale; mostly the "long" parts have been shortened by about 60% to make the principles involved more apparent in the drawing--sort of like the Lionel "Hudsons" built on the 2-4-2 frames.)Part three of this article has photographs of people using this construction technique outside, so if the drawings don't quite make sense the first time you look at them, you'll have a chance to see what it looks like in "real life." |
Tools needed:
Materials needed:
One nice aspect is that all the ripping and part of the reassembly can be done in a comfortable dry workshop months ahead of the actual track-laying. |
In the ShopRip 3/4" wide stringers off the outside edges of the 2x4 leaving a 2" wide core.(Follow the manufacturer's cutting instructions. Also, see Dave Smith's hints about cutting HDPE lumber in part 4 of this article.) |
| |
| For every eight foot length of the remaining core, cross-cut fourteen 1" thick blocks; three 2" thick blocks; and leave the rest of the core for vertical posts. |

| |
| Fasten 1" blocks to one of the 3/4"
stringers, spaced 6" apart, using one deck screw per block. Deck screws
should be galvanized exterior Phillips flat head screws 1-1/2" long
specifically designed for exterior decks. (The extra density of the
synthetic materials stress wood screws and drywall screws
to the point where their heads break off during installation.)
A spacing and hold-down template on plywood is very helpful when producing a hundred feet or more of roadbed. This will speed the process of attaching the blocks to the strips and assure 6" accurate spacing. A 2" block is installed in the middle and at each end (with the block overhanging the stringer by 1" for attaching to the next stringer). |
| |
In the GardenDirectly on the ground bend the roadbed where you need it to go. Use the two inch blocks to join stringers. It is important to provide for staggered joints when the opposite side stringer is attached later. |

| |
| Using clamps to hold the roadbed together in place attach the opposite side stringers. Stagger the stringers. Bill recommends the use of a minimum of three "Quick-Grip - Mini Bar Clamps by Vise Grip Tools - American Tool Co. Inc. or equivalent. |
| |
| Drive the posts into the ground through the roadbed far enough to prevent posts from tipping. Space 2 foot maximum. Do not sharpen the end of the post. Sharpening the post like a stake to make it easier to drive will cause the post to push out of the ground later during frost heave. A square end on the post will minimize this. You are not trying to drive the post below frost line. You are only setting the posts far enough into the ground to prevent them from tipping. Infilling with compacted landscape dirt or fill later will provide the final stabilization. The primary purpose of the posts at this stage are to adjust for grade. Driving the posts far enough into the ground to prevent frost heave will waste material and result in out-of-plumb posts and roadbed racking. |

| |
| Raise the roadbed to the desired level. Clamp in place. Check grade and level. Fasten to posts with deck screws. |
| |
| Once you've doublechecked the grade and the level, saw the posts even with the stringers. |
| |
| Leave natural finish or paint as desired for exposed bridges or trestles. Red oxide spray primer works well. Bill recommends Krylon - Red Oxide Primer by Borden Inc. The plastic wood manufacturers do not recommend painting because the plastic does not permit paint to adhere well especially outdoors. Nevertheless, Bill finds that the Krylon primer has held up better than the rest so far. |
| |
| Attach track to the Flexible Roadbed on 18" -24" centers at the spacer blocks through tie centers with galvanized #6 by 1" pan head course thread screws. (Nails are almost useless with HDPE lumber; use deck screws with coarse threads--they go faster and don't melt the lumber like fine threads will.) Always use self tapping ends. | 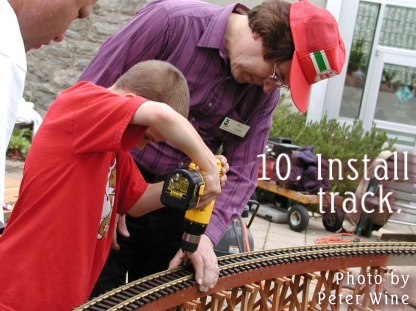 |
Bill's General Comments
|
|
| 
|
|
 |
 |
 |
 |
Note: Family Garden Trains?, Garden Train Store?, Big Christmas Trains?, BIG Indoor Trains?, and BIG Train Store? are trademarks of Breakthrough Communications (www.btcomm.com). All information, data, text, and illustrations on this web site are Copyright (c) 1999, 2000, 2001, 2002, 2003, 2004, 2005, 2006, 2007, 2008, 2009, 2010, 2011, 2012, 2013 by Paul D. Race. Reuse or republication without prior written permission is specifically
forbidden.
Family Garden Trains is a participant in the Amazon Services LLC Associates Program, an affiliate advertising program designed to provide a means for sites to earn advertising fees by advertising and linking to amazon.com.
For more information, please contact us

 |  |
