This free article is sponsored by
Family Garden Trains(tm)
For more information from
Family Garden Trains,
click on any link below:
HDPE Flexible Roadbed Part 4 Garden Railroading Primer Articles: All    about getting a Garden Railroad up and running wellBest Choices for    Beginning Garden Railroaders: a short list of things you're most likely to need when starting out
Large Scale    Starter Sets: Begin with a train you'll be proud to runBachmann    Garden Trains: Narrow Gauge models designed to run well in your Garden Railroad
Large Scale Track    order FormFamily Garden Trains Archive    Articles: Other miscellaneous articles about garden railroading
Large    Scale Christmas Trains: Trains with a holiday theme for garden or professional display    railroads.Free Large Scale Signs and    Graphics: Bring your railroad to life with street signs, business signs, and railroad signs
Garden    Railroading Books, Magazines, and Videos: Where to go to learn even more
Collectible Trains and Villages: On30 Trains and accessories designed by Thomas Kinkade and    others

Written by Paul D. Race for Family Garden Trains(tm)
Photos by Peter Wine for Media Moments


HDPE Flexible Roadbed Method - Part 4

Conclusion

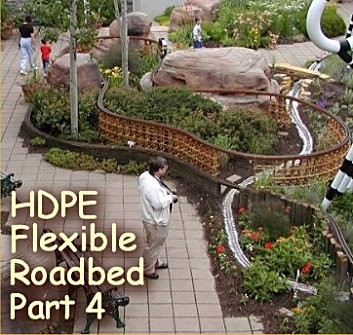
At Franklin Park three people (two assemblers and one gofer) assembled 760 feet of roadbed in two working days including posts and grades (about 25 feet per person-hour). (Installing the trestle bents, backfilling, and landscaping aren't counted into that "person-hour" figure.)

Remember the folks who told us to lay a garden hose in the back yard to decide where the boundaries of our ponds should go (as long as we are using flexible liner)? Well, you can do the same thing for your roadbed, with no fear that you're designing something that you don't have the carpentry skills to create.

So, go ahead and plan. Any kind of curve or combination of curves, any kind of easement, any kind of suspension. Just to be sure to let us know what you've accomplished (and to give Bill his due--Paul).

And if you mess up, or decide a week from now you want it a little different, set your screwdriver to reverse, and do it over.

The VERY best of luck

Paul Race and Bill Logan


Other People's Feedback and Other Additions

Dave Smith, long-time Big-Trains member describes his experience trying to cut the HDPE lumber:

I'm trying out that new HDPE roadbed technique as designed by Bill Logan.

Thus far all I've done is locate a supply of the stuff (no easy feat) and ripped it into the required pieces.

A work of instruction to anyone trying this. I'm using an old Shop-Smith table saw. I took the supplier advice and used a carbide tipped blade with as few teeth as possible. This goes contrary to what I would have used (many teeth, smoother cut!). However, what you're trying to do is minimize friction and heat. So I begin cutting and I smell and see the plastic kind of melting. After 2 or 3 cuts the blade is warm and hardly cutting the plastic. All of a sudden in a brilliant revelation (a VERY rare occurrence for those who know me), I switched the saw blade speed to the lowest speed (you do that on a Shop-Smith by putting the belt on different pulleys). Well, lo 'n behold the saw started ripping through the HDPE like butter. The only other problem I had was the fence moving! So, my other recommendation is, check the fence after each 8' rip.

My next step will be to try and see how the heck you lay this stuff out to form curves in "standard" LGB 1600 curved track (Bill crew seemed to lay the roadbed out free style for flex track. I don't use flex track).


Peter Wine, garden railroad builder and producer of the Holiday Garden Railroads videos says:

I haven't yet been able to find a supplier of [solid HDPD] plastic wood around the Dayton area. Trex does work if you're using moderate to wide curves, but I wouldn't advise using it for tight curves - it will break under enough stress. In 172' feet of roadbed in Eaton, I didn't have any breaks. (Of course, I also modified the project by using some 5/4 width planks instead of the 2x4 style, but we won't talk about that now.)

I do like the method, and would use it again rather than cut 2x6's. The biggest advantage is that the roadbed comes out the same size as the track, and doesn't have the overhang that 2x6's do.

In Franklin Park, where we put in some 800' of the stuff, I think there was about 10' of straight track . . . . The rest was all curves.

About the difference between composite (Trex, etc.) and HDPE lumber, Bill adds: The HDPE lumber is the flexable component. Trex or treated lumber do not bend as much and do not yield as good a solution. Keep it simple - stick with HDPE.

Bill Logan, answering a fellow's question about making the "ladder" framework wider to accommodate two tracks says: Wide ladders and off center post attachment defeat the design and will introduce unwanted torking (twisting of the raodbed and hence the track). Been there done that. Do not rely on the dirt for vertical support between posts. The dirt stabilizes the roadbed from horizontal movement and hides it from view.

Wil Davis, responding to another question about using this method for double track, says: From what I saw, the way to do double track would be to make two and put an appropriate spacer in between to get the center-to-center spacing. If you simply made two and screwed them together they would be so close that the tie ends would touch. I would assemble the first one and one side plus center spacers of the second track. I would then attach this with the appropriate spacers to the first section and once the curve is formed, attach the remaining side. I hope this is clear. There may be a need to have some sort of horizontal support under the assembly due to the increased width.

Turnouts should be no problem, they would just need special cut center spacers, but they could just be screwed to the existing single track at the appropriate point.


Responding to another question about double tracks and about turnouts, Bill Logan added:

  1. 1. Keep the stringers spaced as shown in the article. Remember the stringer is spaced the same width (i.e. 1-3/4") as G gauge track for support, as a guide for rail bending, and an exact fit for the vertical posts. Double track as you noted consists of two identical parallel assemblies of roadbed. Additional blocks can be cut and screw attached as spacers between roadbeds to maintain a consistent spacing. Build one roadbed. Curve as desired. Attach spacers. Then construct the second parallel roadbed to follow the pre-established curve of the first roadbed. Insert posts in both parallel roadbeds for support.
  2. Switches are a combination of two roadbeds blended just like the track rails. Eliminate the spacer block of the switched track roadbed. Screw the stringers together following the curve of the switch leg. This is better shown via a diagram then in words. I will follow up with Paul's website. The point here is - it has been done and it works.

But What About England? - Anthony Kesterton, a decent chap from across the pond provides this feedback about building HDPE flexible roadbed in the UK:

I have started to build the flexible roadbed as described in the article on your site. I first read this a few years ago and hesitated to even start as there was no supplier of recycled HDPE in the UK at the time (that I could find). This has changed - I now use material made by Centriforce (www.centriforce.com) - I buy from FilCris - a company based near Cambridge (www.filcris.co.uk)

I have built half of my first "ladder" as a test - and it looks good so far.

Some issues for UK readers:

  1. 1.5" decking screws are hard to find - I found some at Wickes eventually (in expensive packs of 20!!). You might have to resort to 2" screws.
  2. It may just be the composition of the Centriforce product but I needed pilot holes.You need to drill small pilot holes through the stringer and spacer, or you will most likely break the screw heads off.

The good news is that a simple. cheap tablesaw works well cutting recycled HDPE. I used a new blade on the saw. A handsaw was used to cut the spacers.

I also built a template - but did not think enough before doing this. The template should be the width of a single stringer + spacer block - with very careful equal spacing between the spacer blocks. I will try and draw a diagram to demonstrate this rather than explain it.

I have not yet placed the posts in the ground - I leave in an area with chalky soil, so some digging is going to be required.

Thanks for the excellent article - it has taken a few years to get around to doing this - but it looks like it will be worth it.

Kyle Van Dyke, of Lynchurg, Virgina, writes:

I am currently working on a 200 foot line in the back yard using Bill Logan's HDPE system (the shop article was a great help as well, that clamping jig saved lots of time.) One great change to the method I used was to use 1 1/2" PVC pipe (cheap) for the vertical suppports with 1 7/8" spacer blocks, you get about 30% more line from the HDPE and I will just be burying the pipe or replacing with trestle anyway. I forgot where I first saw this online but it worked great. Thanks for the articles!


Where to Buy HDPE Lumber

Several people have written to say they had trouble getting this material in their "neck of the woods."

The following companies offer HDPE or other "plastic" lumber, although a few of them also offer "comingled" or "composite" lumber (made from woodproducts mixed with plastics, of which Trex is the best known brand name).

The following companies seem to offer comingled or composite lumber only.

A reader from Australia says that REPLAS, a supplier in Victoria, has useful products. (Thanks, Keith)!


Home Pages
Reading Index Pages
Buyer's Guide Pages
Return to Family Garden Trains Home page Return to Big Indoor Trains Home page Garden Railroading Primer Articles: All about getting a Garden Railroad up and  running well Big Indoor Trains Primer Articles: All about setting  up and displaying indoor display trains and towns. Garden Train Store: Index to train, track, and other products for Garden Railroading Big Christmas Trains: Directory of Large Scale and O Scale trains with holiday themes
On30 and O Gauge trains to go with indoor display  villages and railroads


Note: Family Garden Trains?, Garden Train Store?, Big Christmas Trains?, BIG Indoor Trains?, and BIG Train Store? are trademarks of Breakthrough Communications (www.btcomm.com). All information, data, text, and illustrations on this web site are Copyright (c) 1999, 2000, 2001, 2002, 2003, 2004, 2005, 2006, 2007, 2008, 2009, 2010, 2011, 2012, 2013 by Paul D. Race. Reuse or republication without prior written permission is specifically forbidden.
Family Garden Trains is a participant in the Amazon Services LLC Associates Program, an affiliate advertising program designed to provide a means for sites to earn advertising fees by advertising and linking to amazon.com.


For more information, please contact us

Click to see exclusive, licensed Major League  Baseball(r) train and village collections!

Click to see new and vintage-style Lionel  trains.
Click to see new and vintage-style  Lionel trains

Click to see collectible  Christmas villages and trains.